Do you love the look of distressed furniture, but don’t know how to do it yourself? Not to worry—I am here to show you how to easily distress furniture with five different methods! Whether you want a natural softer distressed look, an aged look, or something more dramatic, these tips will help you achieve the perfect distressed finish. So get ready to discover the different ways to give your painted piece of furniture a little bit of distressing!

Shabby Chic, Distressed, Aged, Farmhouse, and French Country furniture. What do all of these styles have in common? They all have some version of distressing, some slight, and some heavy. Distressed furniture is still a hot trend and seems it may not be going anywhere real soon. Whatever your preference is for distressing, you will learn how to easily distress furniture with these different techniques.
This post contains affiliate links. Click here to see my full disclosure policy.
Distressing Furniture by Hand
Hand sanding seems to be one of the popular techniques for furniture. It tends to be the most used form since it is easy. It is a fairly easy method, especially when using the proper paint. Chalk paint and other furniture paint formulas, like General Finishes milk paint, distress very well unlike latex paint which is rubbery. Always make sure to use the proper paints when planning to distress furniture pieces as you will achieve the best results.
It is easier to use a sanding block to distress furniture. Sanding blocks are easier to hold in the palm of your hand compared to sand paper. You can also use the sanding block long after it has worn out by wrapping a sheet of sandpaper around the sanding sponge.
Tip: Clean your sanding blocks with water after each use by gently rubbing them together with another sanding block or a soft bristle brush. This helps to remove the dust build-up and extra debris.

***See the before and after photo of this old desk and the surprise item, I used after distressing.
How to distress furniture with sandpaper
After you have finished painting your furniture piece, lightly sand places where distressing would naturally occur. Use medium to light grit sandpaper, like 220 grit or higher, for more distress. If you only want a little distressing, use fine-grit sandpaper. . Start by sanding the edges of the furniture piece, then work your way towards the raised details.
It is better to start with minimal sanding, step back and look at the piece, and continue to sand as needed. It is much easier to sand more than having taken too much off and needing to paint over.
If you want a really heavy distressed piece of furniture or wood, you are better off using an electric sander, otherwise, it would take too much elbow grease to remove this much paint by hand sanding. Make sure the coats of paint are completely dry before using any method involving sandpaper.
Tip: Use fine grit sandpaper for the finishing sander and don’t push with a heavy hand. Sometimes it does not take much pressure to remove the paint, especially on the edges.
Clean your piece well with a damp rag after sanding. If using a tack cloth, make sure to not press hard as this can leave wax build up on the paint, which could affect your sealer. Once you are happy with the distressing process, seal the furniture piece. If you are wondering what to seal your painted furniture with, check out this great post on “How to seal furniture with the best products.”


Wet Distressing Furniture
For the wet distress method, use a lint-free cloth, lightly dampen the cloth and start rubbing on the areas you would like to remove the paint and distress. Wet distressing works well with a freshly painted item that is still slightly wet or just slightly dry.
The number 1 question everyone asks when it comes to distressing furniture is “What kind of paint do you use to distress furniture?” Again, chalk paint or other furniture paints work best. They are made with materials that easily distress better than wall paint or latex. The type of paint you use makes a big difference in your results.
You can also read this post “Furniture paint types, how to choose the best paint.”
Tip: Use baby wipes to wet distress, works great because they have the perfect amount of moisture.
Another way to wet distress is to wipe away the paint while it is still wet. This works great on raised details and edges.
Wipe away furniture distressing
Watch this video to see the easy wipe-away wet distressing technique.
Resist Furniture Distressing Technique

Resist distressing occurs by using vaseline, beeswax, candle wax, or any type of oil-based product. The resist-distressing furniture technique works great with a 2 tone-distressed look.
Start by applying the first coat of paint (basecoat) and let dry completely. I like to cheat when I do a 2 tone distressed look. I don’t paint the entire item in the base coat color, I only paint in the areas I want to distress. This saves time and money on paint products. Apply the oil-based product of your choice to the areas that you want distressed.
Tip: A little Vaseline goes a long way, you do not have to apply a lot of the oil-based product.Use a thin layer and not a blob.
Paint the second paint layer over the entire piece including over the oil-based products, and let it dry. After the topcoat is completely dry, use a lint-free cloth and wipe down the item. As you are wiping the item, the top paint does not adhere to the areas where the oil-based product was applied.
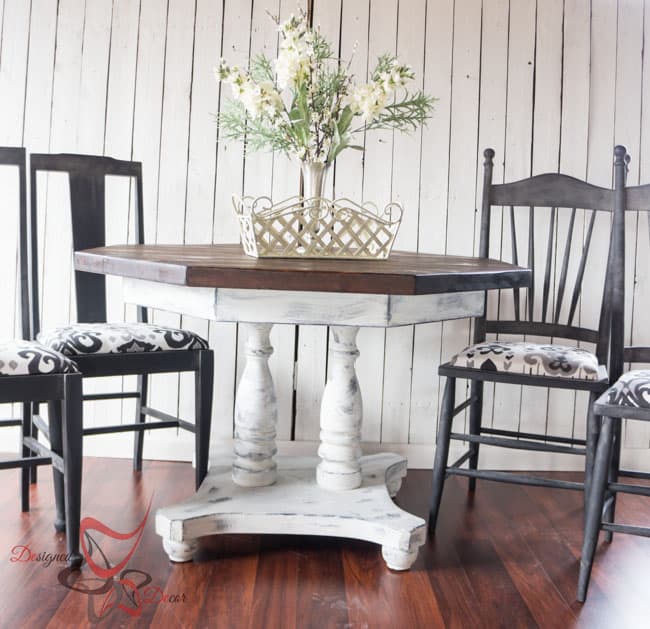
***See how I used Vaseline to distress the Farmhouse pedestal table above.
Natural Distressing Furniture without sanding
Not all furniture distressing has to be done after you paint. You can achieve a natural distressed finish by using a paint brush while you are painting. No mess and no sanding!

The above piece was naturally worn by distressing with a paintbrush. On items that I know I will be distressing, I like to do a brush distressing technique. Brush distressing occurs when you don’t paint the entire piece and distress afterward, you distress as you go by controlling the paint that is painted on the furniture.
You can achieve this look by using very light coats of paint (2 to 3) and a good quality blending paintbrush. Make sure the brush you use is made of synthetic materials, they do a better job of applying a smooth blended finish.
Want to see this technique in action and learn how with step-by-step details? I teach this technique in my online furniture painting workshop video, How to Distress Furniture without Sanding,

Milk-Paint Distressing

***See how I used milk paint on the dresser above for distressing.
Using milk paint is a fun way to distress a piece of furniture because you never know the end result. There are many types of milk paint on the market; Miss Mustard Seed, Old Fashion Milk Paint, Amy Howard, and Sweet Pickens.
All pretty much work in the same manner by mixing the dry milk paint powder with water, painting the furniture, and watching the drying process as the milk paint begins to chip and distress in different areas on the furniture. This is the one method that is hard to control the amount of distressing. Sometimes it is too much or way too little and you may need to the distressing process with the other methods above.
Sometimes you can even use a glaze to achieve a distressed look. How to glaze furniture is for another post and you can check out my “How to Glaze Furniture” online workshop for an in-depth, step-by-step process of glazing furniture.
#1 Advice – Look at a lot of old aged, naturally distressed furniture and pay extra attention to the details and the areas in which the distressing happened naturally over time. The last thing you want is a spotted piece of furniture with random marks of distressing.
Good luck with your distressing techniques and don’t be afraid to try something new. What is your favorite way to distress?
Leave a Reply