Do you have a piece of furniture in your home that needs a makeover but you don’t want to shell out the cash for expensive name brand chalk paints? Making your own chalk paint recipe for furniture is easy and can save you money over expensive chalky finish furniture paints.
Here, we’ll guide you through exactly how to make your own chalk paint recipe with simple ingredients. With very little effort and expense, painting your furniture will be easy and fun! However, if you want to make your own DIY chalk paint recipe, you need to know a few important things first.

This post contains affiliate links. Please click here to see my full disclosure.
Best Practices to Make Your Own Chalk Paint
Chalk paint recipes are becoming increasingly popular, but it’s essential to know the best practices before you get started! I’m here to give you some helpful tips and tricks for making your own DIY chalk paint so that every project is a success.
- Use warm water
Use warm water to mix into the plaster of Paris, (or other powders) this helps to properly dissolve the powder. I measure the plaster of Paris and place it into a disposable plastic container. Slowly add the warm water to the plaster of Paris and mix thoroughly, until all granules are dissolved. This is an extremely important step as you do not want chunks in your mixture when painting. This mixture should be a thin consistency, but not watery.
- Use an Emersion Blender
I find it easier to mix the powder and the paint using this —> handheld mixer. Trust me when I say you can never mix the paint enough to achieve a smooth finish.
- Strain the Paint
Always strain the paint and POP mixture. After you have thoroughly mixed your powder with the water and have a smooth consistency, add the POP mixture to the latex paint into a mixing container. Make sure to thoroughly mix the POP and paint together, using the emersion blender mentioned above. I love this mesh paint strainer over the flimsy paper ones that fall apart easily. The paint strainer removes debris from the paint which allows for a smoother paint finish.
- Make small batches
Make small batches when making your own DIY chalk paint recipe as it tends to dry out quickly over longer periods. Use air-tight glass containers when sealing your leftover chalk paint. Glass keeps moisture better than plastic.
Featured Videos from Designed Décor
Questions about how to make the best chalk paint recipe
- What paint type of paint is best for making chalk paint? You can use any latex paint or acrylic paint in your chalk paint recipe. The better the quality of the paint, the better the homemade recipe.
- Can you turn acrylic paint into chalk paint? Yes, you can use it however, latex paint works best.
- Can you make chalk paint with baking soda? Yes, it does require more sanding as the finish is not as smooth as some of the other powder additives you could use.
- What is the best homemade chalk paint recipe? My personal opinion is the plaster of Paris recipe. See my comparisons below.
- Is homemade chalk paint as good as store-bought? Again, this is a personal preference. I prefer to use premixed store-bought chalk paint. Please see the reasons further down in this post.

DIY Chalk Paint Recipes
You can use a variety of different powders to mix into your latex paint for different recipes for homemade chalk paint. My personal choice that I have used many times is with plaster of Paris.
Plaster of Paris Chalk Paint Recipe
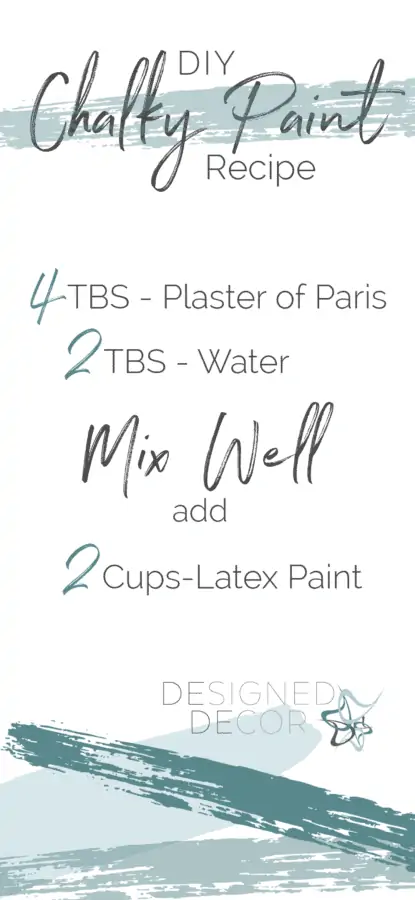
Mix 4 tablespoons of plaster of Paris with 2 tablespoons of warm water. You may need a bit more water to get a thin consistency. Mix thoroughly with the emersion blender and add the 2 cups of strained latex paint. See the best practices above for all the mixing details. ~ Check out this article if you would like to know more about the plaster of Paris. What is plaster of Paris?
Calcium carbonate powder chalk paint recipe
Mix 2 parts latex paint to 1 part calcium carbonate powder. Mix well using the emersion blender. This mixes up well and seems to be the easiest recipe in regards to mixing. You may not find it at your local home improvement stores and may have to order calcium carbonate online.
Baking soda chalk paint recipe
Mix 2 parts paint to 1 part baking soda. As mentioned many times, you need to mix the powder very well into the paint. The baking soda recipe is very gritty when applied. For this reason, I do not recommend using it to make chalk paint.
I have seen many different chalk paint recipes and would only recommend using calcium carbonate recipe as a substitute for the plaster of Paris recipe. I have discovered using baking soda, sanded or unsanded grout works, however, the paint finish is very rough no matter how much you mix the products. The baking soda and the non-sanded grout mixtures dry out very quickly.
DIY chalk paint vs. Manufactured chalk paint
When I first started to paint furniture, I made most of my chalk paint. This helped to save money on my own personal painted furniture projects. This allowed me to use the latex paint color I had on hand and use the paint colors that were in the color scheme of my home.
Once I began selling my painted furniture, I decided to start buying manufactured chalk paint. I did not want to sell an inferior product. I wanted my finished-painted pieces to last over time. Yes, the name brand chalk paints are more expensive, however, my reputation as a quality furniture painter was more important than saving a few dollars.
The other big decision was the manufactured chalk paint sprayed on better than my homemade chalk paint. Spraying on paint is a huge time saving so what I spent on a quart of brand name chalk paint saved me on time with spraying. I also did not want to take the chance of clogging up the paint sprayer.
If you are painting furniture pieces for your own home, I recommend that you give homemade chalk paint recipes a try.
Painting tips when using homemade chalk paint on furniture
- Mix and then mix some more. You need to continually mix the paint as you go. You may also need to add some water to keep it at the right consistency. The open-air time tends to thicken up the paint mixture.
- After the first coat dries, use a light grit sanding block, 400 or higher, to smooth out any gritty texture. Then continue to the second coat of paint. Sanding between coats of paint allows for a smoother finish.
- If your paint seems to be too coarse, add a bit more paint to the mix, thin it out with a little water, and strain it with this mesh paint strainer.
- Some DIY chalk-painted furniture may need to have a distressed look as it may not give you the smooth finish you were hoping for.
- Seal all chalk-painted furniture with furniture wax or my favorite matte finish sealer. For best results, you NEED to seal your homemade chalk paint recipe.
Finished furniture pieces using the DIY homemade chalk paint recipes
I found these leather top-end tables at a thrift store and knew they would have a great future with a little prep work and paint.
I used 2 coats of my DIY chalk-like paint to cover the tables completely. For those who want to know I used Sherwin Williams color #SW7018 Dovetail to make my chalk-like paint. I used Frog Tape Shape Tape Painting Tape, Chevron Design, 1.81 Inches x 25 Yards, 282549![]() to achieve the chevron pattern. You could make your own chevron pattern, but I decided my time was worth buying the pattern tape. I then mixed a lighter version of the homemade chalk paint by adding in some white paint and used a dry brush method on top of the chevron tape. Once I removed the tape, the darker gray color showed through, giving the tables a distressed white-washed look.
to achieve the chevron pattern. You could make your own chevron pattern, but I decided my time was worth buying the pattern tape. I then mixed a lighter version of the homemade chalk paint by adding in some white paint and used a dry brush method on top of the chevron tape. Once I removed the tape, the darker gray color showed through, giving the tables a distressed white-washed look.
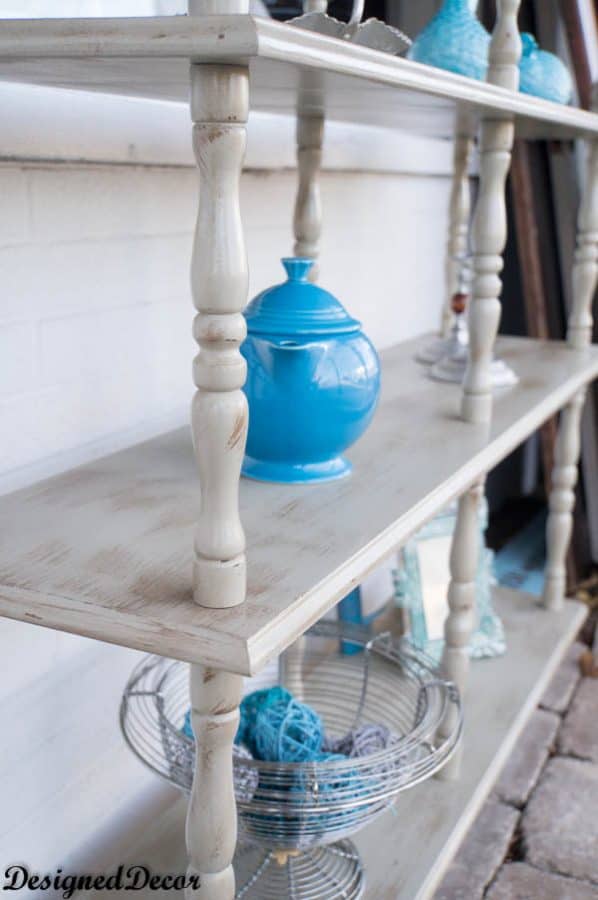
This spindle 3-tier shelf was a roadside find. I used the same color as the leather top tables above. I distressed them quite a bit as it was hard to get a smooth finish on the spindles.
Conclusion and other Furniture Painting Help
Making your own chalk-style paint is not only easy, but it’s also the best way to save money. By following the best practices and using one of the easy recipes above, you can make high-quality chalk paint that will give your furniture projects a beautiful finish. And if you run into any problems along the way or need more help painting furniture, check out these other great resources.
DeDe Bailey
DeDe Bailey is the artistic mastermind behind Designed Décor and The Puzzle Table. With a rich background in home décor retail, she has transformed her website into a platform driven by a profound passion for helping individuals craft spaces they adore. As a self-taught furniture painting artist and thrift decorator, she loves sharing her knowledge and empowering others to beautify their homes through furniture painting and thrifting. When she isn’t sharing her wisdom on the Designed Décor blog, DeDe is occupied with showcasing her ingenious jigsaw puzzle table design and expanding her short-term rental located in NE Ohio.
Get your FREE ELIMINATE BRUSH MARKS GUIDE => How to Eliminate paint brush marks
Aurealisa says
Even though sanding is not necessary, it is still important to clean and dry the furniture surface from dust or oil.
Julie says
I just saw this on Better After and I love it. I was actually searching for re-dos of leather topped furniture this weekend. We have a set with two end tables, a desk, and a side table and I would love to update them. The only problem is that I’m not sure I can bring myself to paint over the leather! Thank you!
Designed Decor says
Julie, my leather was cracking due to neglect, so I had no problems painting over it! If you leather is in great shape, you could get away with not painting the leather. If it is the brown leather you could paint the base a soft pale color and use brown glaze or brown wax over the paint to enhance the brown in the leather.
Debbie @ onelittleproject.com says
What a great transformation! They look fabulous!
Anonymous says
I have recently made some chalk pain using non-sanded grout. Unfortunately I lost the recipe and was looking for a new one. Do you think this one would work if I used non-sanded grout instead of P.O.P.?
Loved your zig-zag table by the way! Very good job!
Monica says
Visiting from DBB. Beautiful. Pinned!
Linda says
Love this. PINNING.
Meegan says
Your tables look fabulous DeDe. Thanks so much for sharing your recipe. Pinned 🙂
Pam @ House of Hawthornes says
Frog tape comes in shapes!!!! I did not know this and now I am going to have to run out and find some! Your table turned out wonderfully!
Designed Decor says
Thanks Pam! You can also order it online form Amazon if it is not at your local stores.
Vidya @ Whats Ur Home Story says
I so need this! Planning on repainting 2 chairs. Pinning it.
Megan @ Rappsody in Rooms says
Thank you for sharing this recipe! After recently getting into chalk paint I am having a hard time paying so much for it. Thanks for sharing your recipe! I love the finished look of these tables.
Designed Decor says
Megan, The price of chalk paint is what encouraged me to make my own and give it a try. I have had great success with all the pieces I have used it on.
kelly arent (copper roof interiors) says
Hi DeDe! I love this table design….I had NO IDEA Frog Tape came in shapes. Thank you for bringing me out of the dark!!!!! Glad I found your site….first time I have ever seen or heard of it. Came on over from Blogtalk….thanks for the like. I’m right above you in the comments. 🙂 Will be sharing this project for you. LOVE IT>
Kelly
Designed Decor says
Kelly, I am so glad you stopped over. I was over on your blog too and loved all the things I saw. Shapetape has not been out for that long, so you are not that far in the dark! lol
Pam from Over the Big Moon says
These turned out amazing! Thanks for the tutorial and recipe – can’t wait to try it out on my next project!
Pam
http://www.overthebigmoon.com
Designed Decor says
Thanks Pam, Let me know if you have questions when you make the recipe!
Crystal says
Thanks for the recipe!! I love how the tables turned out!! So beautiful!!
Susan@organized31 says
DeDe, I feel like you were talking directly to me. Now I just have to snag me a piece of furniture to practice on.
Designed Decor says
Susan, How did you know! That one was for you! Let me know as soon as you find the piece!