Making a Tufted Window Seat Cushion with power tools, no thread, and needles. I have made many different types of tufted items over the years and this is the only way I do tufting. I have never tried it the old fashion way with a thread and needle and probably never will since the power tool method is so easy.


Mr. DD has always said the phrase, “Want an easy way to do things, ask a lazy man.” He infers that he is a lazy man, and he is far from a lazy man. I will use his phrase anyway as it applies to my method of power tool tufting. I like to think it is the smart way to do it, not a lazy way.

This is how my office looked when we moved in, good bones and needed a big makeover.

We removed a seat bench in our guest suite and decided to use all that wood to build a window seat bench in my office. Since we had all the lumber, the only expense was making the cushion.

I originally painted the window seat bench to match the walls and was planning to leave it painted and just add pillows. Mr. DD would always come and sit in my office and EVERY time would say, my bench needs a cushion. He would take the chair pads from my dining room chairs and spread them out on his bench seat. I would put them back and find the cushions there again. I finally decided I would make him a tufted window seat cushion.
Making the Tufted Cushion

This post contains affiliate links. Click here to see my full disclosure policy.

Make an Easy Beautiful Tufted Window Seat Cushion
Tufted cushion using power tools
Materials
- 3/4 " Plywood, 3 or 4-inch Foam Cushion, Spray Adhesive, Batting, Material, Washers, Screws, button cover kit, and E-6000
Tools
- Straight edge, scissors, drill, staple gun, and pliers
Instructions
1. Make plywood template
2. Cut out the foam cushion - adhere to plywood
3. Make tufting pattern, cut tufting marks
4. Cut, Cover foam with battling and material
5. Use washers, screws to drill to create tufting
6. Attach to surface
7. Make button covers and glue over tufted areas
Recommended Products
As an Amazon Associate and member of other affiliate programs, I earn from qualifying purchases.

Step 1- Make Plywood Template

Measure the window seat and cut out the plywood template to fit onto the window seat.
Step 2- Cut Foam Cushion

Cut the foam cushion by laying the plywood template over the foam cushion, mark the cut line, and cut out the foam cushion. I use an electric knife as it is way easier and my hands thank me for it. Also, refer back to “Ask a Lazy Man.”
Step 3- Adhere Plywood and Foam

Spray the plywood with the spray adhesive and place foam cushion on top. I used a twin mattress foam cushion that we already had and no longer have a twin mattress. Check out the prices of matress foam pads before buying craft foam, as sometimes it is cheaper for the mattress pad. The twin foam mattress was not long enough for my tufted bench seat cushion, so I had to piece it together, you will not notice the seem.
Step 4 – Layout Tufting Pattern

Do not pay attention to the holes on the foam pad, that is the way the foam topper came. My template was approximately 24 inches deep, so my rows are 6 inches apart, and my tufting marks are also 6 inches apart. Use scissors to cut and “X” into the foam at each tufting mark.
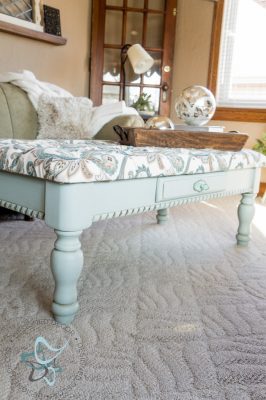
For a very detailed tutorial on marking your tufting, please refer to this post about the tufted coffee table bench.
Step 5 Cut out Batting and Fabric

Make sure to cut your batting and fabric larger than your template, accounting for cushion thickness, plywood thickness, wraparound fabric, as well as a little extra for the tufting. The extra fabric I needed was approximately 5 to 6 inches for each side’s length and width. I always cut larger than needed, because I am always afraid I will not have enough and waste the fabric.
Step 6 – Tufting and Attaching Fabric

I used #8 1-inch wood screws and a 3/4 washer to do my tufting with a power screwdriver. This is my go-to size, but you can use other sizes based on the button size kit you purchase. I am showing the picture from the tufted coffee table bench as a reference. Please see the details from this post on the tips to do before securing the back of the fabric to the plywood.
Step 7 – Attaching the Tufted Window Seat Cushion to Bench

TIP – Do not glue your buttons in place until you know if you need to screw the cushion to the bench seat. My plywood was slightly warped and it did not sit flat on the bench, so I used longer screws to do some of the tufting points. The longer screws secured the cushion to the wood seat.
Step 8 – Making and Glueing the Buttons
TIP – If using thick fabric, as I did, you can’t attach the back on the button as the fabric is too thick. I used the E-6000 to glue the back of the button fabric together and glued it in the tufting hole.
We added a storage drawer to the window seat bench for storage as well as having an access point to the heating duct below in case we ever needed it.
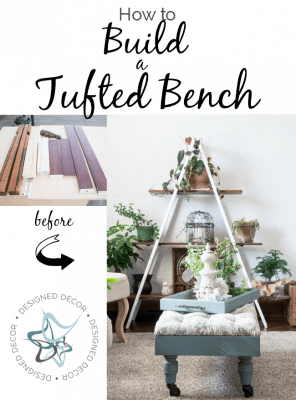
Here are the other tufted projects I have completed –

golo game app says
This is such a fantastic project! I love how the tufted cushion adds a cozy touch to the window seat. The step-by-step instructions are super helpful and easy to follow. Can’t wait to try this out in my own home—thank you for sharing!
lottery 365 says
I absolutely love this tutorial! The step-by-step instructions are so clear, and I can’t wait to try making my own tufted window seat cushion. The fabric choice is beautiful, and it adds so much character to the space. Thanks for sharing such a great idea!
Mp4 Juice says
I absolutely love this tutorial! The step-by-step instructions are so clear, and the tufted cushion looks gorgeous. I can’t wait to try it out for my own window seat! Thanks for sharing such a beautiful and easy project!
365 Lottery Login says
I absolutely loved this tutorial! The step-by-step instructions were easy to follow, and the tufted cushion has transformed my window seat into such a cozy spot. Thank you for sharing this beautiful project!
y89 slots says
This tutorial is exactly what I needed! I’ve been wanting to spruce up my window seat, and your step-by-step instructions make it seem doable. I love the tufted look and can’t wait to try it out. Thanks for sharing!
90CLUB says
This window seat cushion tutorial is fantastic! I love the step-by-step instructions and the tips on choosing fabric. Can’t wait to try it out for my own space! Thanks for sharing!
S8 casino says
This tutorial was exactly what I needed! I never thought creating a tufted window seat cushion could be so simple. The step-by-step instructions were super clear, and my window area looks so much cozier now. Thanks for sharing such a great project!
82 GAME says
I absolutely loved this tutorial! Your step-by-step instructions made it so easy to follow, and the tips on choosing the right fabric were super helpful. I can’t wait to give it a try and add some charm to my window nook. Thanks for sharing such a beautiful project!
Ok win says
I loved this tutorial! The step-by-step guide made it so easy to follow, and the finished cushion looks absolutely beautiful. I can’t wait to try making one for my own window seat! Thanks for sharing such a great idea!
y2meta says
This tutorial is fantastic! I love the step-by-step instructions and the tips on choosing fabric. Can’t wait to try this for my window seat! Thank you for sharing such a beautiful project!
MP3 QUACK says
I absolutely loved this tutorial! The step-by-step instructions made it so easy to follow, and my window seat looks stunning now. Can’t wait to try out more of your DIY projects! Thanks for sharing!